Locators
The locator creator is available in AppraiseJS 0.2 and later.
Locators are named selector definitions referenced by test steps. This page follows the normal creation path in AppraiseJS: open the locator creator, launch Chromium, capture an element, review the suggested values, and save the locator back into the synced workspace.
Before you start
Section titled “Before you start”Have one of these ready before you begin:
- A saved environment if you want to launch from a known base URL
- A direct URL if you want to inspect a one-off page immediately
- A target element on the page that you want to reuse in test steps
Step 1: Open the locator creator
Section titled “Step 1: Open the locator creator”Go to Locators -> Create.
The screen is split into two parts:
Launch Chromium Pickeron the leftFinalize Locatoron the right
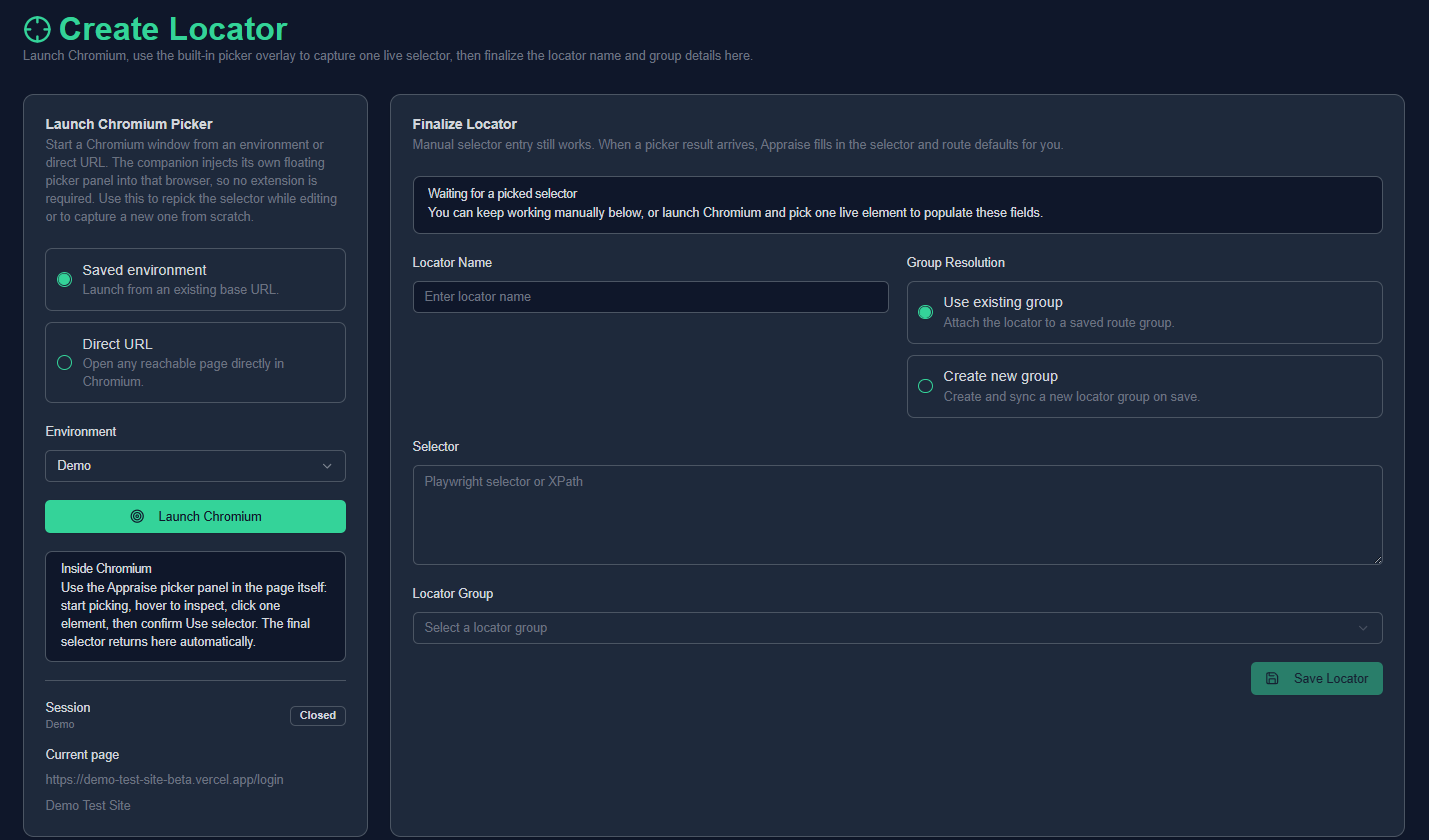
The locator creator starts with launch options on the left and the final locator form on the right, so capture and save stay in one flow.
The picker launches a local Chromium session and injects an Appraise picker panel into the page, so selectors can be captured without a browser extension.
Step 2: Launch Chromium
Section titled “Step 2: Launch Chromium”You can launch the picker in two ways:
- From a saved environment
- From a direct URL
Choose the saved environment path when the page already belongs to an environment you use in Appraise. Choose the direct URL path when you only need to inspect a reachable page without saving environment setup first.
When launch starts, Appraise opens a local companion process and starts Chromium with the picker overlay enabled inside the page.
Step 3: Pick the element in Chromium
Section titled “Step 3: Pick the element in Chromium”Inside Chromium, use the floating Appraise picker panel:
- Click
Start picking. - Hover over the target element.
- Click the element once.
- Review the proposed selector.
- Click
Use selector.
After confirmation, the selected locator is sent back to the Appraise UI automatically.
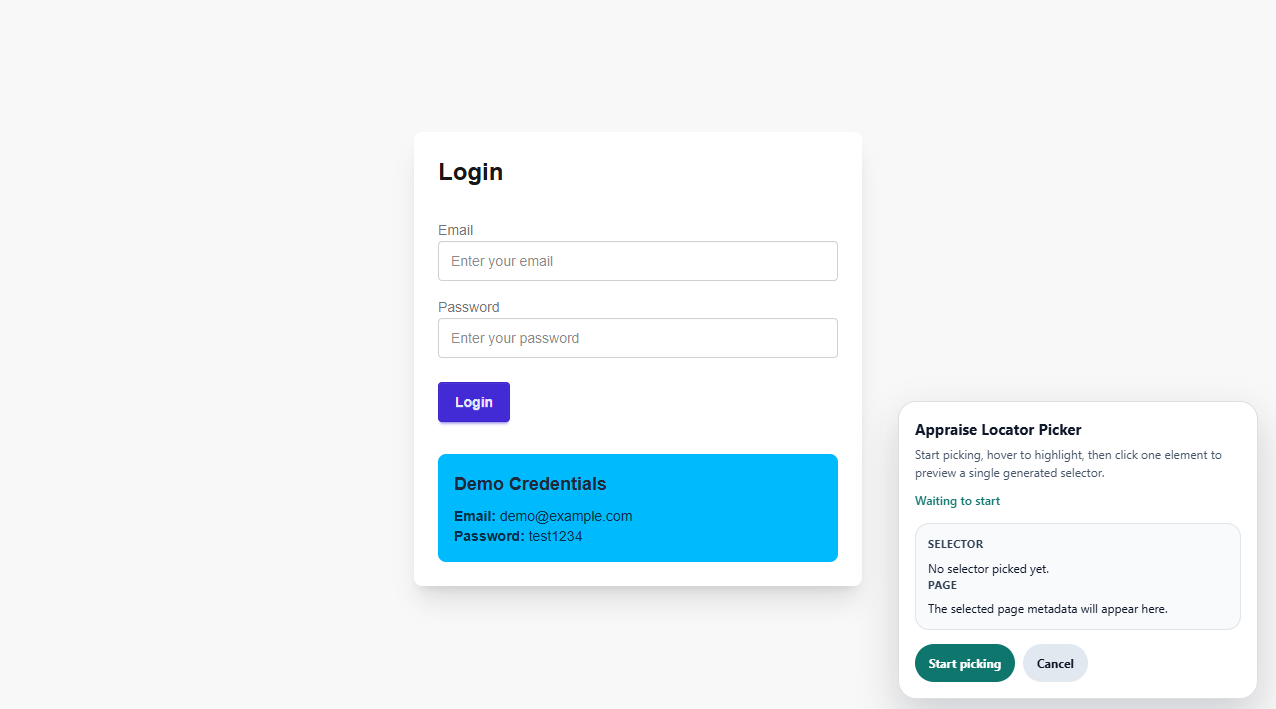
The in-browser picker panel stays attached to the page so you can start picking, inspect a target, and send the selector back without leaving Chromium.
Step 4: Review what Appraise captured
Section titled “Step 4: Review what Appraise captured”When a locator is picked, Appraise captures:
- The selector
- The current URL
- The current pathname
- The page title
- The element tag name
- Accessible or visible text when available
- The selector strategy used
This metadata is sent back into the locator form automatically, so most of the final step is a review pass instead of a full manual entry flow.
Step 5: Review the autofill suggestions
Section titled “Step 5: Review the autofill suggestions”After the picker returns a result, Appraise can suggest:
- A locator name based on accessible text or visible text
- The selector value
- An existing locator group based on the current route
- A new locator group name if no route match exists
- A module suggestion for a new locator group
If the current route already matches an existing locator group, Appraise suggests attaching the locator there.
If no matching group exists, Appraise can suggest creating a new group using the current route and a best-fit module.
Step 6: Finalize and save the locator
Section titled “Step 6: Finalize and save the locator”Before saving, you can still edit all fields manually, including:
- Locator name
- Selector
- Existing group selection
- New group name
- Route
- Module
Use this step to correct anything the picker guessed poorly, especially the locator name or selector value.
When you click Save Locator, Appraise:
- Adds it to an existing locator group or creates a new group
- Synchronizes related locator group files
- Updates the locator map so the automation workspace stays aligned with the UI
Full walkthrough
Section titled “Full walkthrough”This walkthrough shows the complete locator workflow in one pass: launch Chromium, pick an element, review the autofilled fields, and save the locator.
What happens after save
Section titled “What happens after save”- Saving from the locator creator is both a capture workflow and a synchronization workflow.
- For broader filesystem or database drift, use
Settings -> Syncto review pending locator-related differences and run sync from the UI. - The core repo still includes locator sync scripts for repository-wide reconciliation and automation.
npm run sync-locatorsnpm run sync-locator-groups- Locator mappings are maintained in
src/testsartifacts and consumed during execution.
When to use it
Section titled “When to use it”- You need to capture a selector from a live page.
- You want Appraise to suggest a locator name and group automatically.
- You want to create a locator without editing files manually.
- You want the saved locator to sync back into the automation workspace without running separate sync commands.
Good practices
Section titled “Good practices”- Prefer stable
data-testidselectors. - Keep naming human-readable (
loginSubmitButton). - Use the picker for discovery, then adjust the final selector if the proposed value is too brittle.
- Do not duplicate the same selector across many locator names.