Creating Tests
Hands-on tutorial
Build a reusable login test visually and create suites, tags, and needed locators inside the test case creation flow.
Before you begin
Section titled “Before you begin”- AppraiseJS is running locally.
- You have a reachable login page or another small smoke-test target.
- You know which environment URL and credentials are safe to use locally.
What you’ll build
Section titled “What you’ll build”A reusable smoke scenario
You will create a reusable login test that: - Works across environments - Uses centralized locators - Generates executable test code - Can be rerun anytime from the Test Runs screen
Step-by-step procedure
Section titled “Step-by-step procedure”UI path
How to think about Test Cases in AppraiseJS
Section titled “How to think about Test Cases in AppraiseJS”Start with the core building blocks:
- Modules -> groups for test suites
- Environments -> test environment configurations, such as base URLs and API routes. Environments are not required to fill out test case metadata, but they are helpful when creating locators from the builder.
- Test suites -> groups for test cases
The test case creation process has two parts:
- Test case metadata -> setting the test case title, description, test suite, and tags
- Test case flow -> a flow builder for building tests visually so users can create automated tests with less friction
You are not writing scripts. You are designing test logic.
Test cases are where your test logic comes to life. Instead of writing scripts, you visually assemble reusable steps into a complete scenario. Each step represents an action or validation, and together they form a flow that can be executed reliably across environments.
Environment and module setup still happens first. Suites, tags, and locators can be created or selected while you create the test case.
Enough theory, let’s get hands-on.
-
Create a module named
Authenticationso the scenario has a clear home in the product model.
-
Create a new environment named
Localwith the application base URL you want to test.
-
Navigate to
Automate -> Test Cases -> Createor click theCreate Testbutton from the dashboard. -
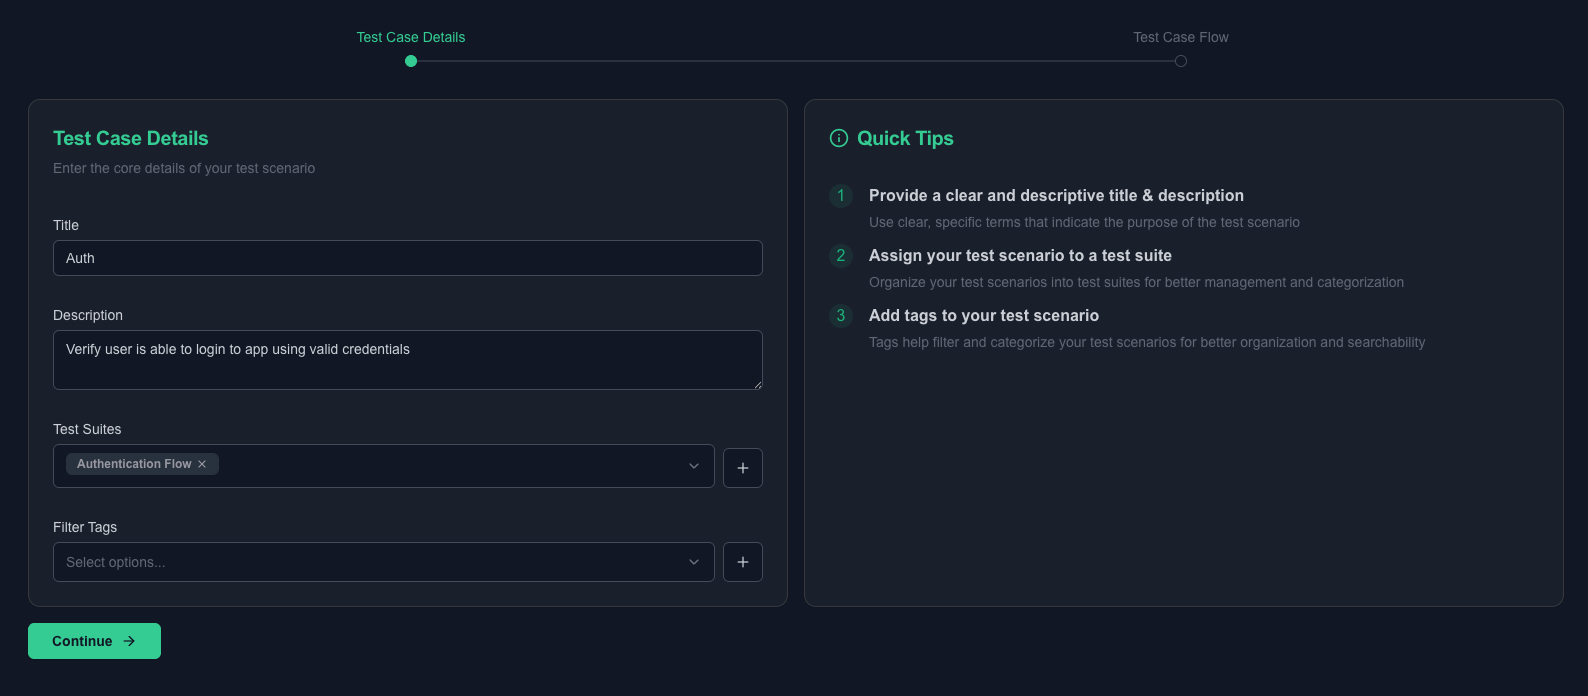
Before building the flow, fill in the basics:
- Title -> short identifier, such as
Login success - Description -> one sentence describing what this validates
- Test Suite -> select an existing suite, or create
Auth Smokefrom the form under theAuthenticationmodule - Tags -> select existing tags or create labels such as
@smokeand@auth
- Title -> short identifier, such as
-
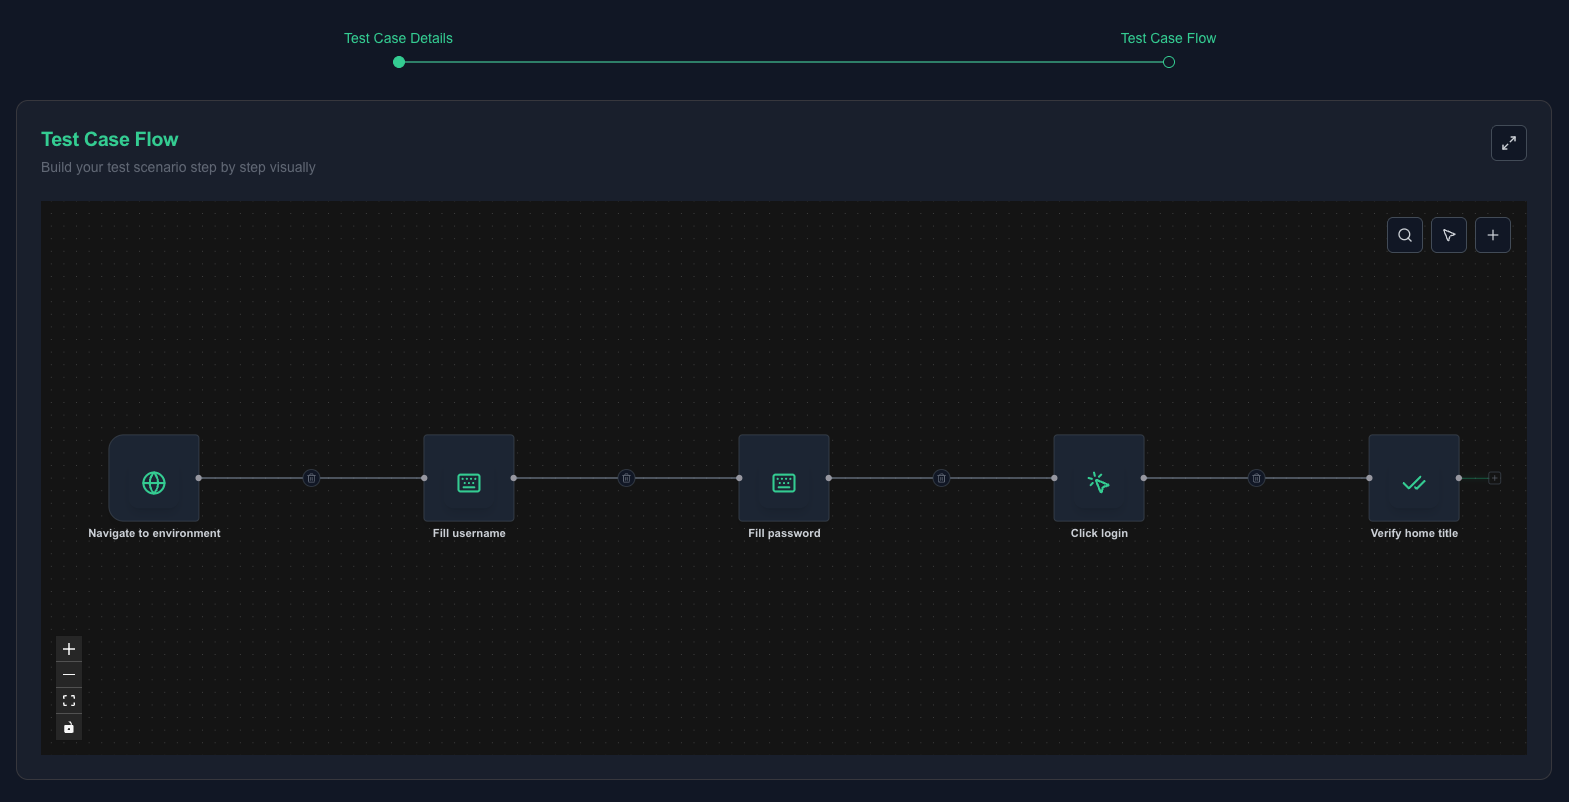
Use the flow builder to construct the test visually:
- Each node is one action or assertion.
- Nodes connect to form a complete scenario.
- Parameters make each step reusable.
-
Use the Scenario Preview panel to watch the generated Gherkin update as you build.
-
Click
Add Nodeand add the first step to navigate to the selected environment base URL so the case is portable across environments. -
Add input step nodes for email and password. When each step needs a locator, create it from the node addition sidebar or select an existing locator.
-
Add a click step node for the submit button and create or select its locator.
-
Add an assertion step node that checks the
welcomeBannervisibility istrue, creating that locator from the same flow if needed.
Here is a demo of the test case editor in action.
Quick sanity check
Section titled “Quick sanity check”At this point, you should have:
- A navigable flow from start to input, click, and assertion steps
- No missing parameters
- A live Gherkin preview updating on the right
- Suite, tags, and any needed locators created or selected without leaving the creation flow
If you see this, you have already built a complete automated test.
- Save the case and re-open it once to confirm every parameter, locator reference, suite, and tag relationship still looks correct.
Here are screenshots of the saved test case editor state with ordered steps and filled parameters.
Checkpoint
Section titled “Checkpoint”- The case opens with a complete ordered flow and no missing required parameters.
- Every referenced locator exists and belongs to a route-aware locator group.
- The suite, tag, and environment names are clear enough that another team member could reuse them later.
AppraiseJS is designed so your test logic stays clear, reusable, and never buried inside scripts.
Common mistakes
Section titled “Common mistakes”- Starting a test case before creating the environment and module it needs.
- Saving a case with literal values that should have been environment-driven or reusable.
- Mixing multiple business outcomes into one case instead of one clear scenario.
- Naming assets too generically, which makes future reuse harder.
Next step
Section titled “Next step”Move to Running Tests to execute the scenario either by tags or by explicit case selection.